X-Ray Guide
The X-Ray tool allows you to inspect a survivor's internal organs for signs of infection. Learn to identify different organ conditions and know when to quarantine or liquidate survivors.
Tool Quick Info
Visual Cues
Survivors with X-Ray symptoms often display visual cues: holding their stomach and bending over in discomfort. If you notice these behaviors, prioritize checking their internal organs with the X-Ray.
How to Use the X-Ray
Equip the X-Ray Device
Pick up the X-Ray device from the medical station. Hold click to activate and view the survivor's internal organs.
Scroll Through Layers
Use your scroll wheel to change between three layers. Layer 1 (top) shows the liver only. Layer 2 (middle) shows most organs. Layer 3 (bottom) shows the brain only.
Examine Each Organ Carefully
Look at the color and condition of each organ. Compare what you see to the symptom patterns: bleeding sores, yellow splotches, purple tint, teal blue color, or black patches.
Mark All Symptoms Found
Unlike the stethoscope, you should mark ALL symptoms found across ALL organs. A survivor can have multiple different symptoms in different organs.
X-Ray Layers Guide
Important
Layer 1 (Top)
Shows the liver only. This is the ONLY layer where you can see the liver.
Layer 2 (Middle)
Shows most internal organs including stomach, intestines, and kidneys.
Layer 3 (Bottom)
Shows the brain only. This is the ONLY layer where you can see the brain.
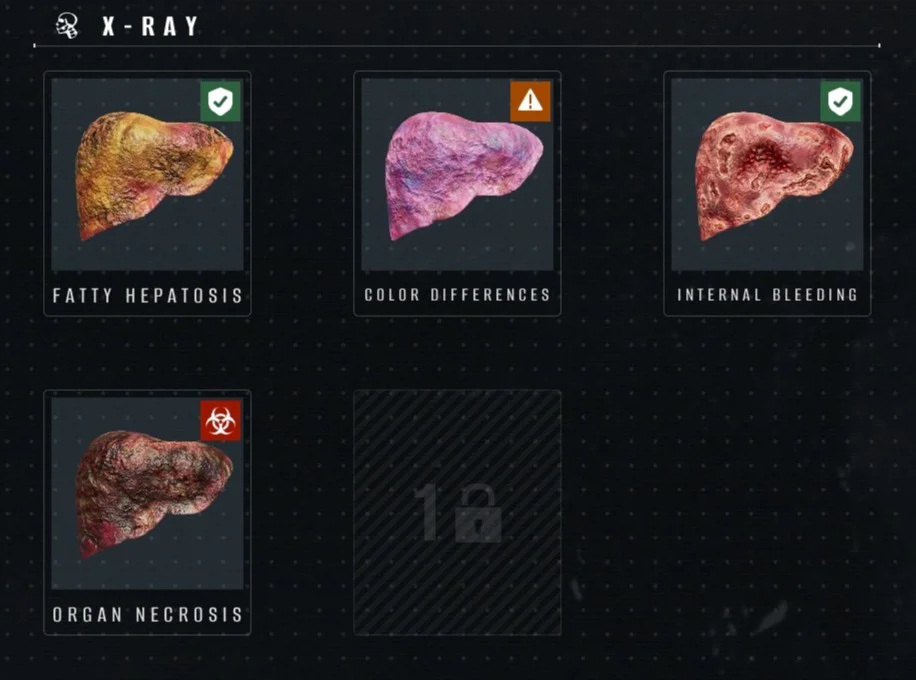
Visual Pattern Recognition
Normal Organ (No Symptom)
Healthy reddish-brown color with no discoloration, spots, or patches. Do not mark anything.
Internal Bleeding
Visual Cue
Organ still reddish color but covered in bleeding sores
Action
Allow into Living Block
The organ maintains its normal color but has visible bleeding sores on its surface. The survivor is not infected.
Fatty Hepatosis
Lab RequiredVisual Cue
Organ covered in yellow splotches
Action
Allow into Living Block
Yellow fatty deposits visible on the organ surface. Note: The pancreas naturally appears yellow - don't mark it as a symptom.
Color Differences
Lab RequiredVisual Cue
Organ colored purple or slightly pinkish purple
Action
Send to Quarantine
The organ has an abnormal purple or pinkish tint instead of the healthy reddish color. Must be unlocked in the lab first.
Moldy Organ
Lab RequiredVisual Cue
Organ colored teal blue
Action
Liquidate Immediately
Unmistakable teal/blue coloration of the organ indicating severe infection. The survivor must be eliminated immediately.
Organ Necrosis
Lab RequiredVisual Cue
Organ almost fully covered in dark black splotches
Action
Liquidate Immediately
Dead tissue appearing as dark black patches covering most of the organ. The survivor is definitely infected.
Symptoms Detected by X-Ray
| Symptom | Visual Cue | Danger Level | Action |
|---|---|---|---|
Internal Bleeding | Organ still reddish color but covered in bleeding sores | Green - Safe | Allow into Living Block |
Fatty HepatosisLAB | Organ covered in yellow splotches | Green - Safe | Allow into Living Block |
Color DifferencesLAB | Organ colored purple or slightly pinkish purple | Orange - Quarantine | Send to Quarantine |
Moldy OrganLAB | Organ colored teal blue | Red - Infected | Liquidate Immediately |
Organ NecrosisLAB | Organ almost fully covered in dark black splotches | Red - Infected | Liquidate Immediately |
Pro Tips
Common Mistakes to Avoid
Only checking one layer
✓ Always scroll through ALL 3 layers - you can miss the liver (Layer 1) or brain (Layer 3)
Marking the pancreas as Fatty Hepatosis
✓ The pancreas is naturally yellow - only mark yellow splotches on OTHER organs
Only marking the worst symptom
✓ Unlike stethoscope, mark ALL symptoms found across all organs
Confusing purple (orange) with blue (red)
✓ Purple/pink = Quarantine. Teal/blue = Liquidate. Look carefully at the hue
Skipping X-Ray when scanner doesn't indicate it
✓ Trust the entrance scanner - if no X-Ray symbol, internal organs are fine